Fortinet FortiGate Transparent Web Proxy on v6.x Setup Walkthrough

This tutorial will walk you through setting up a transparent proxy on a Fortinet Firewall running v6.x code. This tutorial was written on v6.0.1.

Why would you want to do this? Straight from the Fortinet Cookbook here, https://cookbook.fortinet.com/transparent-web-proxy-56/:

“With the transparent web proxy, you can forward your user’s web traffic to the proxy without requiring your users to reconfigure their browsers or without needing to publish a proxy auto-configuration (PAC) file.”

There are a couple of differences in the instructions from v5.6 to v6.0.1 so the intent of this post is to provide an updated Cookbook article.

First off, make sure the FortiGate is in Proxy mode.
Go to System -> Settings and scroll down to the bottom.
Under the System Operations Settings section, select Proxy where it lists the Inspection Mode:

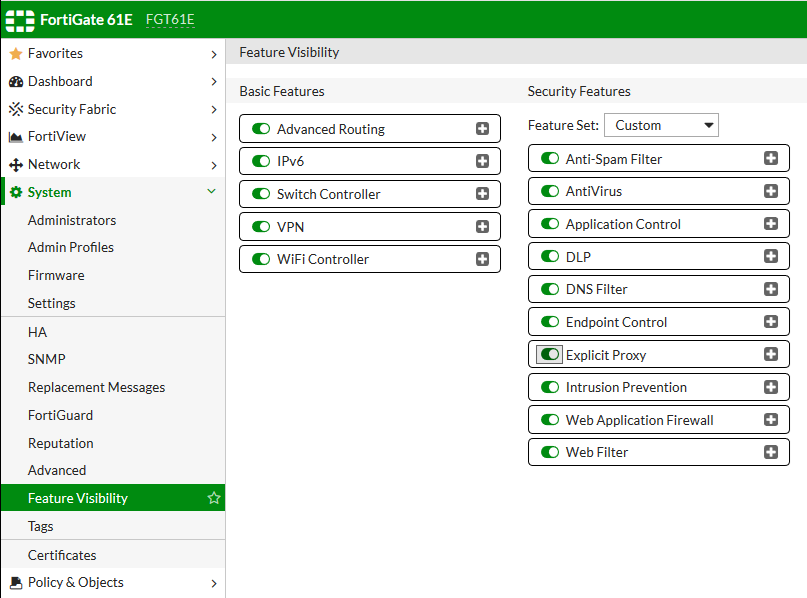
Now, enable Explicit Proxy under Feature Visibility:
Continue reading Fortinet FortiGate Transparent Web Proxy on v6.x Setup Walkthrough

Running Docker on Ubuntu 16.10 Yakkety – Solved

If you try to install Docker on Ubuntu Server v16.10 (Yakkety) using the installation script provided by Docker, this will result in the error “E: Unable to locate package docker-engine”. My solution was to change the repository it was grabbing from Yakkety to the LTS (Long Term Support) version 16.04 – Xenial.

  1. Update package info and install certificates
    sudo apt-get update
    sudo apt-get install apt-transport-https ca-certificates
  2. Install the recommended pre-requisites
    sudo apt-get install linux-image-extra-$(uname -r) linux-image-extra-virtual
  3. You can skip running the installation script, as this will result in the error “E: Unable to locate package docker-engine”.
    wget -qO- https://get.docker.com/ | sh
  4. Update the docker.list file to force it to pull from the other repo. You can verify it updated correctly by reading the file to the screen. Only the one line should be in the file.
    echo "deb https://apt.dockerproject.org/repo ubuntu-xenial main" | sudo tee /etc/apt/sources.list.d/docker.list
    cat /etc/apt/sources.list.d/docker.list
  5. Update package info again and then install Docker
    sudo apt-get update sudo apt-get install -y -q docker-engine
  6. Start Docker and verify that it is running
    sudo service docker start
    sudo service docker status
    CTRL+C
  7. Run a test image
    sudo docker run hello-world
  8. Give your non-root user permissions to run docker. Change “myusername” to your user.
    sudo usermod -aG docker myusername


Getting Started with Docker & VMware Photon OS

There is a ton of good information out there about Docker, but I wanted to provide you with a more consolidated walk through that gets you started from ground zero. In the spirit of virtualization, isolation, and containerization, this guide is going to leverage the open source Photon OS from VMware. Let’s get started!

  1. Go to vmware.github.io/photon/ and download the appropriate ISO or OVA for your environment.
    1. For the purposes of this guide, I deployed the Minimal hw v11 OVA into my vSphere cluster, but I have successfully done the same thing within Workstation.
    2. You can also build a VM from scratch (1 vCPU, 384MB RAM, 8GB Disk minimum) and use the ISO (which will also allow you to deploy the “Full Version.”) Note that the OVA will deploy a VM with 1 vCPU, 2GB RAM, and 16GB Disk.
  2. Once deployed and powered on, either use the hypervisor’s console or SSH into the VM, then login with “root” and “changeme”
    1. The first time you log in, you will be required to change the password.
  3. Surprisingly,  Docker isn’t running, so start Docker, then verify it is working, by running:
    1. systemctl start docker
      docker ps

      The “docker ps” command lists running containers, which we don’t have yet, but will error out  if Docker isn’t running properly. You will see an output like “CONTAINER ID IMAGE COMMAND CREATED STATUS PORTS NAMES” if Docker is working.

Continue reading Getting Started with Docker & VMware Photon OS